(3rd in a series on The Sprang Hairnet. Start reading from the beginning here.)
When I decided I needed a sprang hairnet to cover my bobbed hair for my Bronze Age impression, of course I turned to Pinterest first to see what others were doing about equipment.
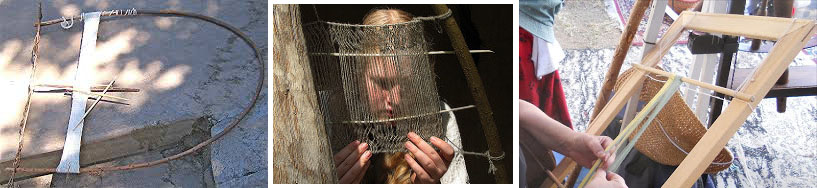
(Pinterest is the bomb, right? I didn’t have Pinterest when I started Greet’s Middle Ages in 2005. Links to sources, from left: 1, 2, 3)
Problem definition
So of these, of course I liked the primitive look in Pics 1 and 2. Conveniently, I have a yard to cut a sapling. But I’ve also been reading up and trying other loom constructions, and wanted to use some features from other historic looms to solve problems that might occur in a sprang setup.
Problem 1 – Adjusting warp tension and removing the work
Picture 1 above – how do you get the work off? Looks like you take the frame apart. Not something I wanted to have to do. Also, anyone who’s played with overtwisting a cord knows that it will shorten. I knew I’d need a way to adjust tension mid-work.
Problem 2 – Portability
Gotta keep the loom small and light, because I like to work at events, or in front of the television.
Problem 3 – Holding the frame
How do you hold the frame, and still have both hands free to twist the threads? Without sitting at a table, because at an event I don’t like to be chained to a table, and at home I’d rather sit on the sofa! Picture 2 gave me the idea – as my eyesight has also become middle-aged, I want to be able to put those threads right up to my face.
Problem 4 – Looking ancient and not from the hardware store
So no PVC, and no frames made from dimension lumber, or artist canvas stretcher bars, as convenient as they are.
Solution!
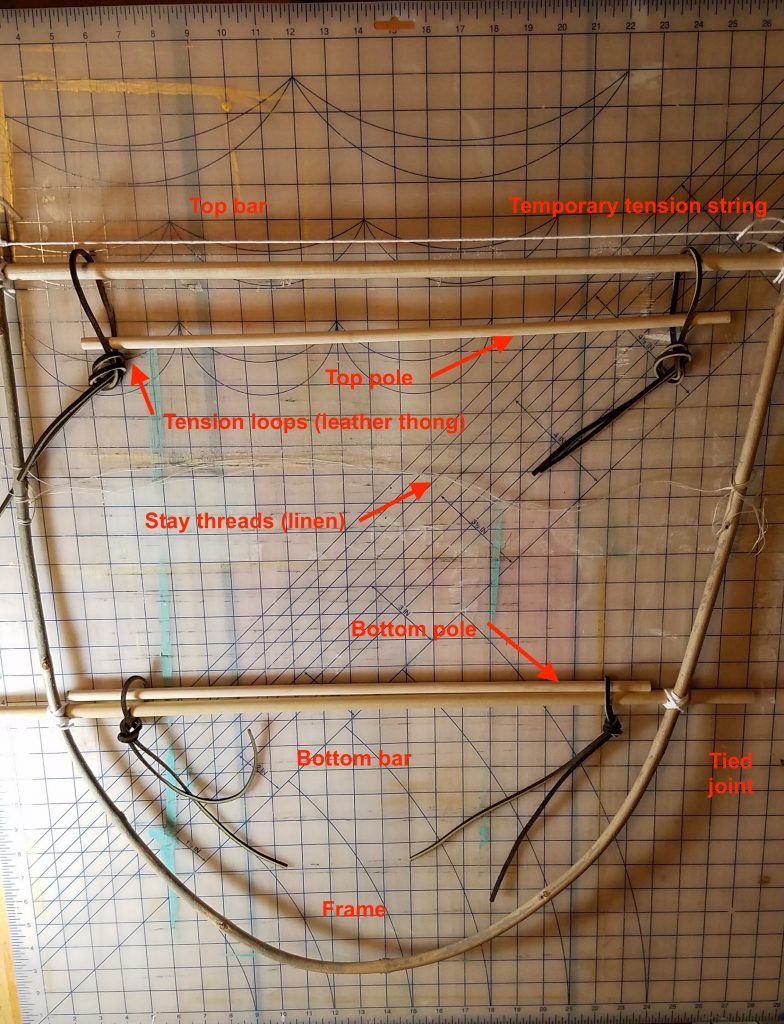
So the above is the loom I made. I bought some smooth white oak dowels, 1/2″ diameter, and cut them to 20″ long, which I judged wide enough to reach around the back of my head. I cut a white oak sapling in the woods, bent it, and tied it to the dowels.
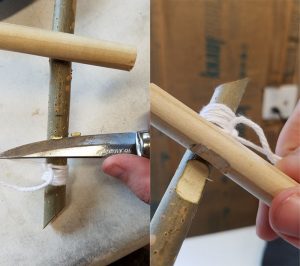
IMPROVEMENT: I did my first hairnet, the one for me, with the loom joints just tied together. When I decided I might make hairnets for others, I decided to notch the loom joints so they wouldn’t slip. So the present loom doesn’t need the ‘Temporary tension string’ in the labelled photo above.
Problem 1 solved – Adjust the warp tension
In researching other types of looms, and my experience with the Dorset Loom, I’ve learned that I’ll have more flexibility in working with the loom if I don’t expect any one part to have major multiple functions.
To be specific, some of these other looms (like Pic 1) are using the top frame of the loom as a ‘top beam or bar’. The loom needs structural stability, which is provided by its frame. The beams are stiff dowels that the warp is attached to. If you use both a bar and a top pole, rather than attaching the warp directly to the top bar, you can adjust tension on your warp by adjusting the attachment of the bar to the frame. It’s more complex, but the benefits are worth the added setup.
I have found the leather thongs to be resistant to slippage, and easy to adjust when necessary.
Problem 2 solved – Small and light
This loom weighs very little, probably only a few ounces. When I’m not using it, I hang it on a single finish nail. It’s flat, so I can easily pop it on top of a load in the car, or carry it around an event site. (I ought to add attachment points to my backpack basket, to make it even easier to carry!)
Problem 3 solved – How to hold
Holding may be my favorite part of this design, and I don’t have any reference for this, other than “it just works.” When I’m working at the loom, I thread my feet through the bent part of the sapling and sit on it. This allows me to have the fabric directly in front of my face, so I can look carefully at all those little twists, and reduce back strain from reaching across empty space.
(I need someone to take a picture of me doing this! Stay tuned, I’ll get one.)
Problem 4 solved – Looking ancient and not from the hardware store
Well, partially solved. I want to get some patina on my dowels. I carefully considered using more saplings to replace them, but the loom needs the stiffness of the hardwood dowels, and their smoothness and evenness does contribute to being able to use the loom easily.
If I spent a little time sanding and finishing the dowels, that would be a worthwhile investment. Do any woodworkers have any advice in this regard?
In the next installment, I’ll show warping the loom!